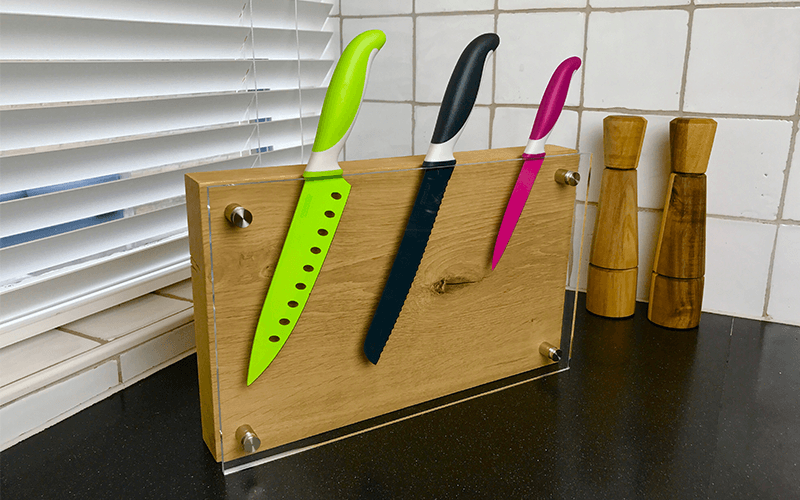
DIY: acrylic knife block

Looking for a way to store your knives that’s a bit different from the usual magnetic knife block or wooden holder? In this blog, we’ll give you step by step instructions on how to make a knife block using an acrylic sheet and wood or bamboo. Your knives will be stored away safely and securely but easy to reach when needed. Check out the instructions below to find out how to make this stylish kitchen accessory.
You’ll need:
- Chopping board or block in hardwood or bamboo
- Clear cast (GS) acrylic sheet 6 mm
- Stainless steel spacer (4 pieces)
- 8 x stainless steel screws, 4 x 30
- HSS drill bits, 3 and 8 millimetres
The basis for making your kitchen knife block
We’re going to use a hardwood board measuring 40 x 25 x 8 cm. Our acrylic sheet is 6mm in thickness. Opt for moulded acrylic as the cheaper extruded type is difficult to work with. Naturally, adjust the measurements of the acrylic sheet to fit the size of your hardwood board. Because the DIY knife block is going to be used in the kitchen, it’s important to select materials that are easy to clean and will withstand water and kitchen cleaning agents.
Making a DIY bamboo knife block
If a bamboo knife block suits your decor better than a hardwood one, go for it! Thanks to its durability and beautiful appearance, bamboo is a very popular material for kitchen accessories. If you choose this option, we recommend using a bamboo chopping board that’s about 8 cm thick as the basis of your knife block.
Step 1: Order the acrylic sheet
Measure your bamboo or hardwood chopping board carefully then order two sheets of 6mm thick moulded acrylic with the same measurements. You need to order two sheets because our knife block is going to be two-sided. You’ll find clear acrylic sheet in a range of sizes and thicknesses in our webshop. Acrylic sheet is also available in a range of smoky shades and neon colours to suit all tastes. We cut the acrylic sheets to size for you for free, so all you have to do is to drill the holes.


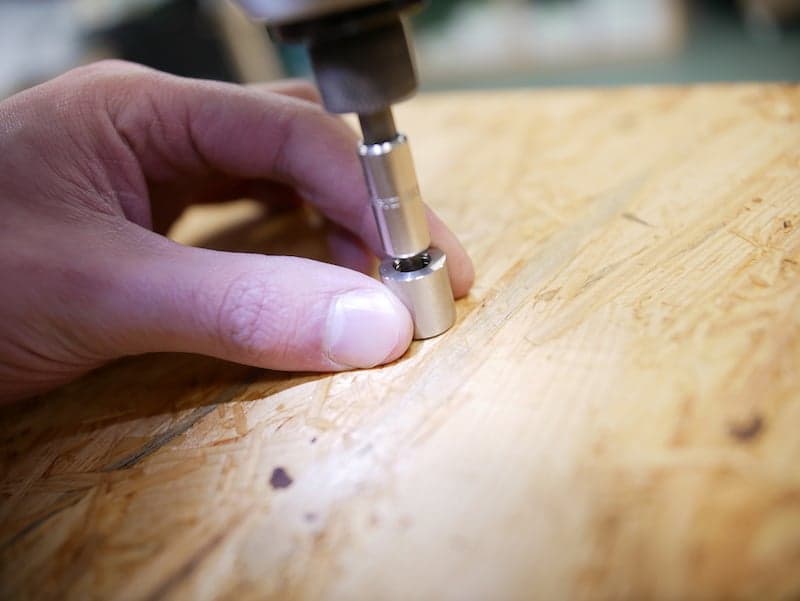
Step 2: Drill the holes in your knife stand
The simple yet stylish design of your DIY knife block rests or falls on the finish, so work carefully. First, Mark out where the holes will be. Stick on some masking tape and mark the holes on this. Leave the protective film on the acrylic sheet in place for now. This will help to prevent any scratching. Drill the holes at least twice the sheet thickness from the edge of the sheet, so in our example, this will be 12mm away. So you need to make the centre of each hole 16mm away from the edge, one at each corner. Always place a wooden board under the acrylic for the drill to run into. Sink the hole using a countersink or sovereign drill, so that the head of the bolt will lie flat against the surface of the acrylic. Countersink the hole carefully and check regularly to see whether the bolt is flush against the sheet.
Tip: For more information, read our blog about drilling acrylic.

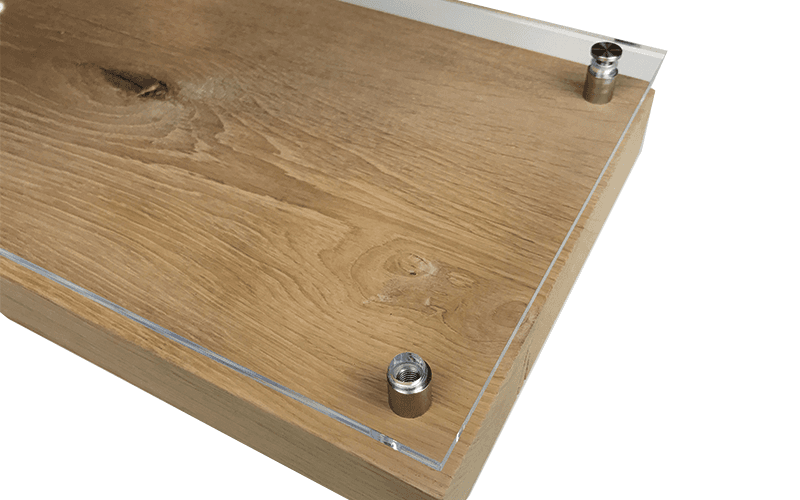
Step 3: Fix the spacers to the chopping board
Take both sets of spacers and position the coupling bushes in line with the holes you have already drilled in the acrylic. Your bamboo or hardwood chopping board measures the same as your acrylic sheets so the spacers will be in the same position as in the acrylic sheet, i.e. 16 mm from the edge of each corner. Now screw all four spacers to the wood or bamboo board using stainless steel screws. Do the same on the other side of the block.
Step 4: Assembling your acrylic knife block
Now it’s time to mount the acrylic on the wood. Lay the board on its side and remove the protective film from the first acrylic sheet. Treat both sides with an antistatic cleaner, this will prevent dust from adhering and makes it easier to clean the acrylic. Next, place the first acrylic sheet on the spacers. Next, turn the 4 cups on the spacers. Don’t overtighten them, or there is a risk of the acrylic tearing.
Turn the knife block over so that the side with the acrylic sheet is facing downwards. Rest it on a soft surface such as a towel. Now fix the second acrylic sheet to the chopping board. Add your knives and voilà, your new knife block is ready to use.
The advantages of an acrylic knife block:
- You’ll never take the wrong knife again;
- Your knives are stored securely and will stay sharp;
- An attractive way to show off your collection of kitchen knives;
- More hygienic than a standard knife block as acrylic is easier to clean;
- You can store your knives on both sides;
- Your knives are held more securely than on a magnetic knife holder.

Looking for more DIY inspiration?
View our blog for tips on working with acrylic and more fun DIYs. If you have questions about this job or any of our products, please contact us.
Other blogs you may be interested in