How to make a DIY towel rack

Would you like to stop your kitchen wall from getting grubby where you hang your towels and tea towels? It’s easy to solve this problem by making your own acrylic towel rack. In this blog, we give you step by step instructions on how to tackle this project.
To make a DIY towel holder, you’ll need:
- Clear cast (GS) acrylic sheet 3 mm
- 6 spacers
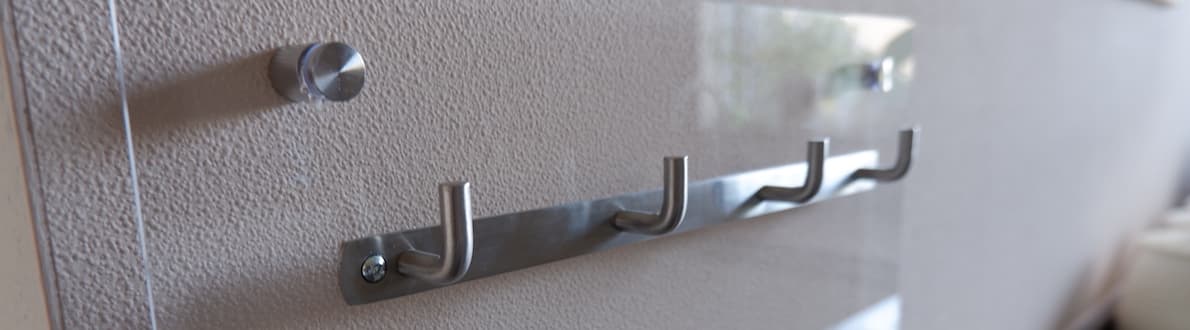
- Towel holders/hooks of your choice
- 2 x M4 nuts and bolts
- Drill
- Drill bits with different diameters
- Masking tape
- Spirit level
- Tape measure
- T-Square
The basics of making a DIY acrylic towel holder for your kitchen
The first step in making your towel rack is to decide the measurements of the acrylic sheet. In our example, the towel rack is hanging above the waste bin. To protect the whole area from water splashes and dirt from the bin, we decided to use an acrylic sheet with dimensions 40 cm x 120 cm. Crystal clear acrylic looks subtle and minimalist, but of course, you can opt for coloured or tinted acrylic if you prefer. Make sure to order cast acrylic, as the extruded (budget) version is more difficult to work with.

Step 1: Order the acrylic sheet for your towel rack
Now you have determined the size of your towel rack, order your acrylic sheet online. You can order custom-cut acrylic sheet in whatever shape, colour, and thickness you require in our webshop. If you’re unsure about the thickness to order, please consult our free thickness aid for advice.
Step 2: Drill holes in your acrylic sheet
Before attaching the acrylic sheet with the spacers, first, pre-drill the holes. The distance from the drill hole to the edge must be at least one and a half times the diameter of the spacer support. Mark the drill holes in advance on a piece of masking tape and leave the protective film in place while drilling to stop the acrylic from being damaged. Now, pre-drill the holes where you’re going to place your towel rack. If you’re using adhesive hooks, you only need to pre-drill the holes for the spacers.
Step 3: Attach your homemade kitchen towel rack
Once you’ve pre-drilled the holes, you can hang your DIY kitchen towel rack. Secure your towel rack to the sheet with two bolts and nuts. Then fix the bases of the spacers to the wall with screws. The base of the support has a screw thread that easily screws into the head of the holder. Hand tighten the cup head. Your towel rack is now ready for use!
Tip: Clean your acrylic towel rack regularly using an anti-static cleaner to prevent it from attracting dust. Your towel rack will also look beautiful for longer.
More DIY kitchen towel rack ideas
Has our blog inspired you to make your own kitchen towel rack? You’ll find an extensive range of transparent, tinted and coloured acrylic sheet in various thicknesses in our webshop. We saw all sheets to size in any shape you like. We can also laser-cut your own designs: all you need to do is upload your design on a DXF file. If you have questions about this job or our products, please don’t hesitate to contact us.