How to make a floating acrylic frame

They’re stylish, contemporary and literally give an extra dimension to any prints that you frame: floating frames. These borderless frames can carry all imaginable prints: photos, cards, artworks … you name it. Floating frames owe their name to the way in which they are attached to the wall: with spacers. This makes it look as if the print is floating in front of the wall, giving it an unexpected depth and transforming your print into a striking eye-catcher. Moreover, it’s fun and certainly not expensive to make a floating acrylic frame yourself. How do you do it? Read on to find out more!

Requirements:

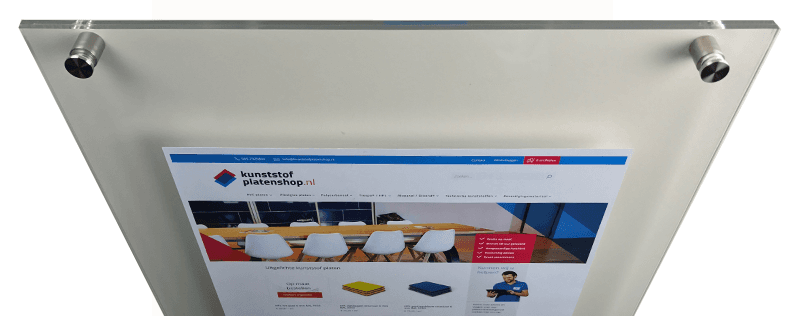
Create a floating acrylic frame – it’s so easy!

Acrylic sheet has long been a favourite material for makers of frames and displays. The reason is simple: the material is affordable, durable and clearer than glass. Moreover, it is 30 times more impact-resistant than glass. No wonder you come across acrylic frames everywhere in stores and museums. Tip 1: always opt for cast acrylic, the cheap variant (extruded acrylic sheet) breaks very easily when you drill it. Tip 2: Acrylic of 4 millimetres thick gives sufficient effect of depth.

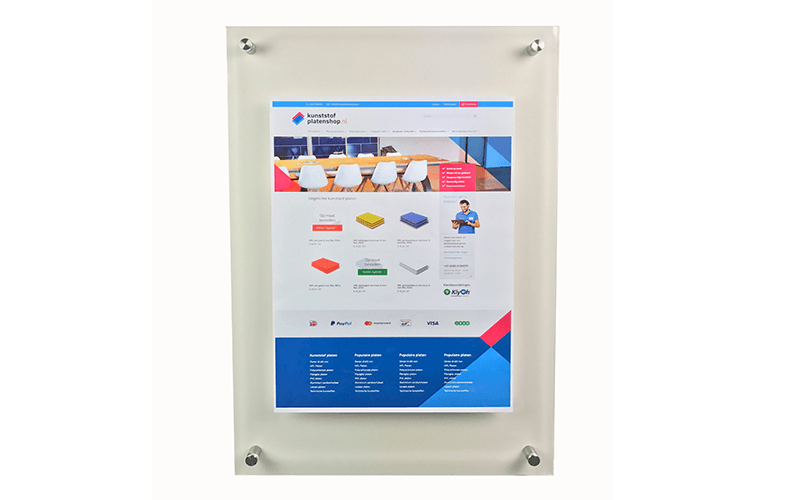
Before you order acrylic, you must first determine the size of the frame. For a maximum “floating” effect, you must keep a border of around ¼ times the height around your print. Just an example: if you have a photo that is 30 centimetres wide and 20 centimetres high, then the border becomes 5 centimetres around. After all, ¼ times 20 centimetres is 5 centimetres. The total size of your list will then be 40 by 30 centimetres. Tip: we will be using spacers so order some now!

Let’s get to work!

Once your order has arrived, you can get to work. You must leave the protective film on the acrylic sheet while working on it. Stick a few strips of masking tape along the edges, you can mark the drill holes easily on this, and it protects the acrylic during drilling. We start by marking the drill holes. For our spacers, we have to drill a 10-millimetre hole, it is important that the hole does not get too close to the edge. An important rule of thumb is: twice the plate thickness is the minimum distance from the sheet edge to the drill hole. Suppose your acrylic sheet is 4 millimetres thick, then the minimum distance between sheet edge and hole is 8 millimetres. Our drill hole is 10 millimetres, of which we add half (5 mm) to this distance: that is the centre point of the hole.
To prevent the acrylic sheet from tearing, you must place it on a solid surface during drilling where the drill can run out, for example, a wooden board. You drill the holes in two steps: first, a hole of 5 millimetres, followed by the hole of 10 millimetres. Don’t press too hard, but let the drill do the work.

Drilling acrylic

Mark and drill holes on the wall

The next step is to mark the holes for the spacers on the wall. It is important that you do this job with precision. You can calculate the position of the drill holes in the wall based on the drill holes and the sheet dimensions of the frame. Use a (laser) spirit level to mark the holes perfectly horizontally and vertically on the wall. The spacers are mounted with a 3-millimetre screw, for which a 5-millimetre plug must be inserted into the wall. That means you have to drill 5-millimetre holes. After drilling, insert the plugs into the wall and screw the feet of the spacers against the wall.

Attach the print to the acrylic sheet

Now it’s time for the most accurate job: glueing the print onto the acrylic. You do this with glue dots. Remove the protective film from one side of your acrylic sheet. You can choose to treat the plate surface with an antistatic cleaner, this prevents the frame from attracting dust. If you are making only one acrylic floating frame, you can omit this step, but if you are making several, this is definitely recommended.

The glue dots go at the extreme corners and along the edges of your print. You can mark the position of the dots on the foil on the front of your frame. Mark the contours of your print on the front, the protective film is transparent, so you can just see the contours and the position of the dots on the back. Then turn the sheet over and stick the dots. Now comes the crucial step: applying the print to the acrylic. Start from a top corner and first stick the top edge. You then work diagonally from the starting corner to the lower corner. Wipe the back of the print a few times with a soft (microfibre) cloth to remove any air between the acrylic and the print.

Attach the acrylic floating frame to the wall

Now you can attach the frame to the wall: place the frame against the wall holders and turn the spacer heads loosely against the acrylic. Now you can remove the foil on the front of your frame, possibly you can treat the front with anti-static cleaner. Once the foil has been removed, tighten the spacers. Note: fixed is fixed! If you tighten the cups too tightly, you run the risk that your acrylic sheet will tear. And that’s how you do it! The working time per floating frame is approximately 45 minutes to one hour. We wish you the best of luck with your DIY!